Help · Between shows
Sell online: your store, Facebook and sale events
Open "Sell" and tap "Online". It shows each place you sell: "Your store", "Facebook posts" and "Sale events". Cards need no dates to go online. Online needs signal, and it is hidden in show mode, so the table only ever sees "In person".
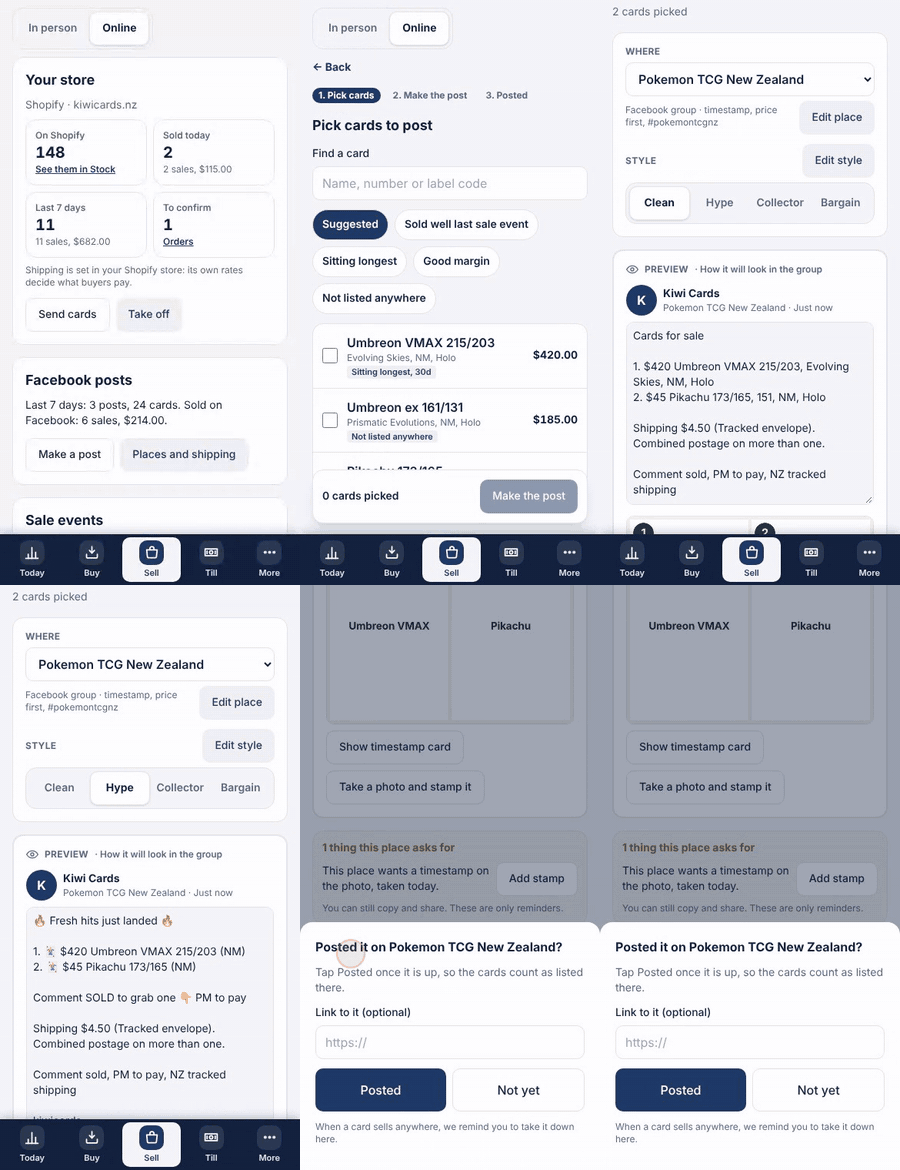
- Under "Your store" you see how many cards are on Shopify, what sold today and in the last 7 days, and the orders waiting for you under "To confirm". Store not connected? It says "Connect your store in Settings, Channels". Only the owner connects it.
- To put cards on your store, tap "Send cards", tick them and tap "Send to Shopify". Cards with no price, none on hand, or already on Shopify are skipped, and the message counts each, the same as Send to Shopify on Stock. "Take off" lists what is on your store: tick cards and tap "Take off Shopify".
- Many cards at once from "Stock": filter first, for example a game and "Ready to send", then tap "Select" and "Select all 650 that match" (it says how many match) to pick every card that matches, not only the ones on screen, up to 5,000. Tap "Send to Shopify" in the bar. Before sending it says how many will be skipped and why. Tap "Send 625 to Shopify": they go 500 at a time, and "Stop after this batch" stops before the next one. Stopped or cut off part way? "Send the other 125" sends only the rest. "Take off Shopify" works on the whole selection the same way.
- The Shopify filter in Stock has "On Shopify", "Not on Shopify", "Ready to send" (a price, some on hand and for sale) and "Can't send yet", where each card says what is missing: "No price" or "Not for sale". "Fix the 20 with no price" lists them with a price box each, suggested by your selling rules at the last market price, or "Check market" when there is none. Tap "Use suggested for all 16", then the "Save prices and send" button: each price saves like any price change, and boxes left empty stay off Shopify. With no signal the prices wait on the phone and the sending starts when the signal is back. Change not for sale under "Selling rules" on the card.
- For Facebook, Trade Me or any of your sales channels, tap "Make a post" under "Facebook posts". Tick the cards and tap "Make the post". Pick the place in "Where": a group, Marketplace, Trade Me or a place in your own channel (it opens on the last place you used), then a style: "Clean", "Hype", "Collector" or "Bargain". The "Preview" shows it as it will look; edit the words there if you like.
- Under the preview, the place's rules are checked: a timestamp on the photo, price first, required tags, posting days, links, and the Trade Me title and description lengths. Each is a reminder, never a block, and most have a fix: "Add stamp", "Move price first", "Add tag", "Trim to fit".
- On a phone, tap "Share to Facebook": the post text is copied, then the share sheet opens with the photo. In the group, long press and Paste. Back in TenthPocket, tap "Posted", or "Not yet". On a computer, tap "Copy post" and "Download photo". In the TenthPocket app, "Save photos" opens the share sheet with just the photo, so you can save it to your phone, and "Copy post" and "Open the group" are there too. For Trade Me each card is its own listing, with "Copy title", its "Price" to copy, and "Copy description". The price is your price, plus the percent in "Trade Me price over your price, percent" if you set one (it starts at 0); on a phone "Copy and open Trade Me" copies the title and opens Trade Me.
- After you copy, share or open the channel, it asks "Posted?" on every channel (for Trade Me, whether you listed it). Add the link if you have it, then tap "Posted" (or "Not yet"), then "Mark posted". On a post you can also tap "I have posted it". When someone claims a card, tap "Sold one? Log the sale", pick where it sold in "Sold on" (your channels, in Posts, Listings and Your own), then "Hold the card and add the order": it makes an order that holds the card and takes it down where you listed it by hand.
- Running a claim sale, a live sale or a drop? Tap "New sale event", choose "Claim sale", "Live sale" or "Drop", the dates and where, then "Start and pick cards". Its board shows what sold on each channel; "Pick cards and post" adds more.
- "Close this sale event" moves what is left into the next one, or leaves it listed in no sale event. Closing a week made before moves them into a sale event you have already planned, or leaves them listed: it never starts another week. Once it has ended, its board shows how it went, with "Open the full report".
Connect your store
- For now we make the connection ready for each store first. Email hello@tenthpocket.com with your store's myshopify.com address. We send you a link to approve TenthPocket on your store.
- Once you have approved it, open Settings, Channels, type your store under "Your store" and tap "Connect". Only the owner connects the store.
- Tapped "Connect" before your store is ready? It says we set Shopify up with each store for now and how to ask. Nothing is changed on your store.
Setting up your store
- After you connect Shopify, "Set up your store" asks two things: "Send new cards to your store automatically?", with a "Minimum price", and "Confirm paid orders by themselves when every card matches?". Tap "Save", or "Not now" to leave them as they are. It asks once, on any phone, and only owners and managers.
- A store connected before this is asked once too, the next time an owner or manager opens Settings, Channels or Sell, Online. Change either answer any time in Settings, Channels.
- Every Shopify buyer with an email becomes one of your customers as their order arrives: their name, email and shipping address, and on your list only if they said yes on Shopify. Their page says "Came from Shopify" and their Shopify sales show beside their table sales. An order with no email, a test order or a cancelled one makes no customer.
- Orders from before can be added once: tick "Add the buyers from your past Shopify orders" when it is asked, or tap "Add" on that line in Settings, Channels. "No thanks" leaves them. Past buyers come in with their name and email only.
Shopify orders
- A paid Shopify order where every card matches by its code and is free, with no discount, confirms itself: it is logged as a sale and goes to To pack, and the order says it confirmed itself. Activity shows who as Shopify.
- Anything else waits in Orders for you, as before: a card it could not match by its code, a card already held, an order not paid yet, a discount, a test order, a Shopify POS sale, or one Shopify flags as risky or cancelled.
- An order cancelled or refunded later on Shopify is not undone here by itself. Undo the sale in TenthPocket by hand.
- Rather confirm each one yourself? Untick "Confirm paid orders by themselves when every card matches" in Settings, Channels.
Your sales channels
- Where you sell is in Settings, "Channels", "Sales channels", or "Sales channels" under "Places and shipping" on Online. Your shop started with your country's channels: it says "Started with New Zealand channels". They are in "Posts", "Listings" and "Your own", each marked "Drafting" (we write it, you paste it in), "Connected" (we send it for you) or "Custom". "Coming soon" ones cannot be switched on yet.
- Switch any channel off with the switch beside it. It leaves "Where", new sale events and "Sold on", but sale events made with it keep it, and its posts and sales stay in Reports.
- "Add a channel" adds one from the list, like eBay, Instagram, Discord or Whatnot. "Add your own channel" adds one we do not list: give it a "Name", say whether you put up "A post" or "A listing", and set a "Title limit" or "Text limit" if it has them, then "Add channel". Then add a place in it with its rules, the way you add a Facebook group.
- Only owners and managers can change channels. Everyone in the shop can post, mark posted and log a sale on any of them.
- Facebook posts and sales from before 10 November show under "Facebook groups", with the ones made since.
Good to know
- Shipping is set in your Shopify store: its own rates decide what buyers pay. TenthPocket sends no shipping, weight or rates to Shopify. Your packages under "Places and shipping" are for Facebook posts and Trade Me.
- New listings stay drafts on Shopify until "Show listings to buyers" is on in Settings, Channels.
- Closing a sale event leaves your cards on Shopify unless you tick Take off Shopify too when you close it. Your store keeps selling between sale events.
- A group that allows links can end a post with a link to your store: tick "This place allows links" on the place, then "Add store link at the end" on the post. It only shows when a card in the post is live on your store, never a draft.
- Places and styles are shop wide. Owners and managers add and change them: "Edit place" and "Edit style" in the post, "Add a place" at the bottom of "Where", or "Places and shipping" on Online. A place keeps its rules: the timestamp way, price first, required hashtags, posting days and more. A style is an opener, "Each card line" built from words in square brackets like [Name] and [Price], a closer and a sign off, with a "Preview with your cards". Everyone in the shop can post with them.
- Your groups from before are places now, with the same settings, and posts in the "Clean" style read as they did. Marketplace is a place too.
- No signal? "Make a post" still works: it shows the cards from the last time there was signal and says so, and the post is written and copied on the phone.
- In Reports, pick a "Sale event" to open "Sale events": takings and sell through for each one, and under "See the detail" cards sold, gross profit, average sale, buyers, best sellers, games, shipping against postage and what is still listed. Its dates become the report's dates.
- Sale events you made as a week before still list, close and report. A new one is a claim sale, a live sale or a drop.
- Show helpers do not send to the store or take cards off it.
- Orders you add by hand take any of your sales channels in "Where", your own ones too.